
Page 297 - ProShow Producer Manual
P. 297
297
Add a Fade In or Fade Out in Timeline View
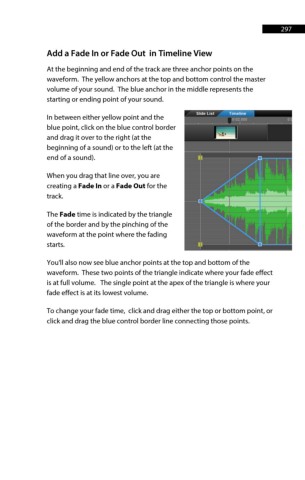
At the beginning and end of the track are three anchor points on the
waveform. The yellow anchors at the top and bottom control the master
volume of your sound. The blue anchor in the middle represents the
starting or ending point of your sound.
In between either yellow point and the
blue point, click on the blue control border
and drag it over to the right (at the
beginning of a sound) or to the left (at the
end of a sound).
When you drag that line over, you are
creating a Fade In or a Fade Out for the
track.
The Fade time is indicated by the triangle
of the border and by the pinching of the
waveform at the point where the fading
starts.
You'll also now see blue anchor points at the top and bottom of the
waveform. These two points of the triangle indicate where your fade effect
is at full volume. The single point at the apex of the triangle is where your
fade effect is at its lowest volume.
To change your fade time, click and drag either the top or bottom point, or
click and drag the blue control border line connecting those points.