
Page 296 - ProShow Producer Manual
P. 296
296 12. Music and Sound Effects
The expanded view only affects the Timeline. If you click the Slide List tab,
or press the TAB key on your keyboard, you'll toggle back to the normal
sized Slide List.
Later in this chapter you'll learn how you can use this option to more
precisely adjust your Soundtrack volume.
Making Audio Edits Using the Timeline View
Audio in your Soundtrack can be freely adjusted in Timeline View. You
can change the offset, adjust volume and fades, or make a clip of your audio
all from the Timeline.
Let’s start with the basics:
To Change Audio Volume Using Timeline View
1. Above the Slide List, click on the Timeline tab, or press the TAB
key on your keyboard to open the Timeline view.
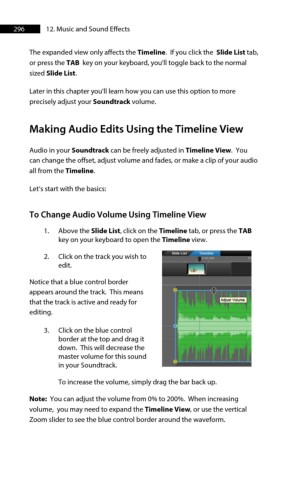
2. Click on the track you wish to
edit.
Notice that a blue control border
appears around the track. This means
that the track is active and ready for
editing.
3. Click on the blue control
border at the top and drag it
down. This will decrease the
master volume for this sound
in your Soundtrack.
To increase the volume, simply drag the bar back up.
Note: You can adjust the volume from 0% to 200%. When increasing
volume, you may need to expand the Timeline View, or use the vertical
Zoom slider to see the blue control border around the waveform.