
Page 168 - ProShow Producer Manual
P. 168
168 8. Layers
These steps have set you up with a new slide that contains four layers. The
bottom layer, Layer 4, will become a backdrop for the rest of the layers. The
other three will be placed around the slide to make things look interesting.
As you work with each layer, remember that you can hide the layers on your
slide -often making it a little easier when creating montages like this one.
To hide a layer, uncheck the box next to the layer number, or right-click on a
layer and go to Visibility > Hide.
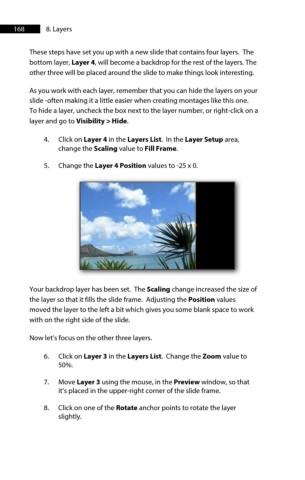
4. Click on Layer 4 in the Layers List. In the Layer Setup area,
change the Scaling value to Fill Frame.
5. Change the Layer 4 Position values to -25 x 0.
Your backdrop layer has been set. The Scaling change increased the size of
the layer so that it fills the slide frame. Adjusting the Position values
moved the layer to the left a bit which gives you some blank space to work
with on the right side of the slide.
Now let’s focus on the other three layers.
6. Click on Layer 3 in the Layers List. Change the Zoom value to
50%.
7. Move Layer 3 using the mouse, in the Preview window, so that
it’s placed in the upper-right corner of the slide frame.
8. Click on one of the Rotate anchor points to rotate the layer
slightly.